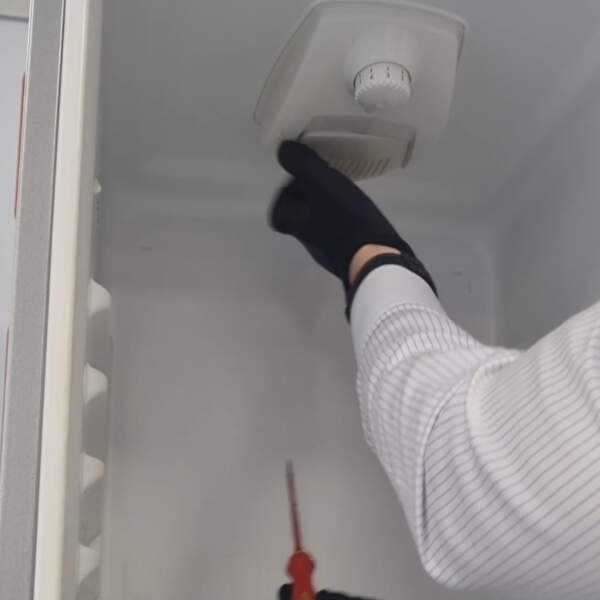
How to Change an Oven Light

The light bulb in your oven may seem like a minor part, but it’s actually incredibly important for a number of reasons – and often you won’t realise just how important it is until it breaks and needs replacing!

Your oven bulb plays a crucial role in providing visibility and convenience during cooking. When you open your oven door, the lightbulb allows you to see the contents clearly so you can assess whether or not your food is cooked. Plus, you can inspect the contents more clearly from the outside, without the need to open the oven door.

The oven light is also a great visual indicator that the oven is turned on. When the oven is in use, the bulb will emit light, providing a clear signal to users that the oven is on and caution should be exercised.

Fortunately, replacing the light bulb in your oven is a relatively straightforward task that can be easily carried out at home! Continue reading for a step-by-step guide on How to Change an Oven Bulb, or follow along with our helpful Video Guide for instructions.

Will any light bulb work in my oven?

No, you won’t be able to use a standard lightbulb that you would use in light fittings in your oven. Oven light bulbs are specially made to higher standards to ensure they can withstand the high temperatures they’ll be subjected to inside your appliance.

You’ll need to purchase the right type of lightbulb for your oven model from a trusted appliance spares supplier.

Will the oven still work without the light?

Technically, yes your oven should still get hot if your light has stopped working. However, it will make your life considerably more difficult. You won’t be able to identify whether or not your appliance is on, and you won’t be able to tell when your food is cooked as easily!

Can you replace an oven light yourself?

Yes absolutely! Replacing an oven light bulb is possibly the easiest DIY appliance repair task you could ever need to complete – especially when it comes to ovens. In only a couple of steps, you can replace your oven light bulb yourself with ease.

Step 1

Before you get started, it’s vital to take the appropriate safety precautions.

We strongly recommend that you safely isolate the machine from its power supply. This is usually as simple as unplugging your appliance from the power socket, but for larger hardwired appliances, you may need to turn the power off at the isolator switch and turn off the fuse in your fusebox.

Also, ensure that your oven has completely cooled if it’s been used recently before attempting to change the bulb.

Step 2

Once your appliance is safe to work on, it’s time to gather your tools.

You’ll need your replacement oven light bulb that fits your appliance model and you may need a screwdriver to remove the panel or lightbulb cover.

We also highly recommend wearing protective gloves while you complete this task; not only will they provide you with extra grip meaning you get the job done more easily, but they will also protect your hands from cuts and injuries that could occur if the glass bulb were to smash.

Step 3

Locate the light bulb.

This should be easy enough, but if you’re struggling to find the exact location of your light bulb then you can always refer to your oven’s user manual for more information.

Step 4

Remove the light bulb cover.

Most ovens have some form of cover over their light bulbs to protect them from fat, grease and food debris.

If there is a glass cover over the bulb, gently unscrew it by turning it counterclockwise.

If there is a panel or cover obstructing the bulb you’ll need to use a screwdriver to remove the screws securing it in place. Set the screws aside in a safe place as you’ll need them again later.

Step 5

Remove the old bulb.

You should now have clear access to the oven light bulb. Wearing your gloves, carefully unscrew the light bulb by turning it in a counterclockwise direction.

If the bulb is a push-and-turn type, gently push it in whilst turning it counterclockwise.

Step 6

Install the new bulb.

Using light pressure, gently screw your new replacement light bulb into the socket and make sure the bulb is entirely secure.

Step 7

Replace the light bulb cover.

Return the glass or panel back to its original place, securing it in place with the screws you removed or screwing it in clockwise until it’s secure.

Step 8

Test the new light bulb.

Switch your oven back on and turn it on to ensure the new light bulb is working correctly. If it doesn’t light up you should double-check that you completed all of the previous steps correctly.

If it still doesn’t work then it could be a more serious problem. We recommend contacting your local NAC Appliance Repair Technician for assistance; they’ll have your oven light fixed in no time!

Other guides you may be interested in...

Changing A Fridge Bulb thumbnail image
Why Choose NAC?
Same & Next Day Repairs Icon Same & Next Day Repairs Icon

Same & Next Day Repairs

We aim to send an engineer on the same day of reporting the fault or the next day where possible.

All Repairs Guaranteed Icon All Repairs Guaranteed Icon

All Repairs Guaranteed

We believe in our skills and follow that up with a standard guarantee of our work to give you peace of mind.

No Hidden Charges Icon No Hidden Charges Icon

No Hidden Charges

We understand the importance of budgeting and make sure you are fully aware of all costs in advance.

Family Run Business Icon Family Run Business Icon

Family Run Business

Husband and Wife team Adrian & Amanda set the standards at NAC with over 40 years experience.